
Setting up a New Mohs Laboratory for Success


The key to success in setting up a Mohs laboratory is workflow. No matter how top-of-the-line the equipment or how shiny the new laboratory space is, it works against the laboratory's best interests if the workflow is chaotic and illogical. The cost of placing equipment and work surfaces in the correct configuration from the very start is generally negligible, but the payoff is significant. Save money, time, and reduce errors by laying out the laboratory efficiently, with proper space to work.
Laboratory Workflow
Efficiency in the laboratory reduces errors and increases possible caseloads. Inefficient layouts increase wasted steps, backtracking, and lapses in concentration. These contribute to mistakes, potential harm to patients, and a reduced capacity to process cases.
The "U"-shaped cell is the most efficient and logical layout for most linear step processes. The work enters at one end of the "U" shape, traveling in one direction, with the finished product emerging from the other end. In the case of the Mohs laboratory, the workflow remains consistent but can be configured in multiple ways depending on lab design:
- Mohs map and specimen are brought into the lab and put into a designated area.
- The tech assigns an accession number to the case and checks for labeling accuracy
- The tech embeds the specimen, cuts the sample, and checks for a complete epidermis.
- The slides are stained and cover-slipped.
- Place the case in an area where the surgeon can read the slides.
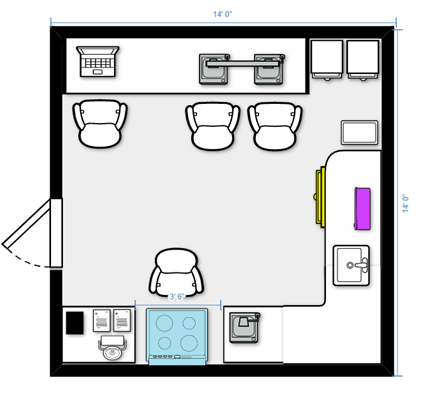
See Figure 1 for an All-in-One Mohs Laboratory Design
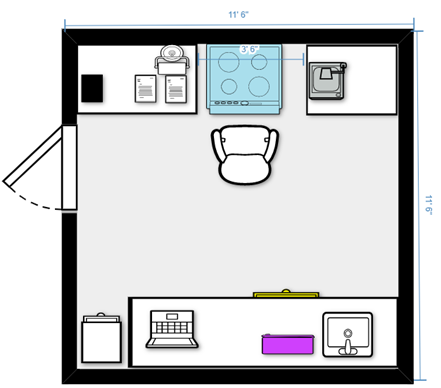
See Figure 2 for Processing Only Mohs Laboratory Design
See Figure 3 for Tight Space Mohs Laboratory Design
Space considerations
Space for a Mohs laboratory does not need to be vast. There must be sufficient space for specimens to be processed safely and efficiently, completing all paperwork and filing in an orderly fashion while leaving enough room for laboratory equipment to function correctly. Cryostats, for example, have required clearances, and there must be a workspace adjacent to the cryostat for the technician to embed easily and keep cases in order. Some things to consider when planning laboratory space are:
- Proper ventilation: Cryostats generally require a minimum of 6 inches of clearance on all sides for adequate cooling. A cryostat bay 40 inches wide, with a minimum of 18 inches open benchtop on both sides, is ideal, but space constraints may limit this to one side. If only one side is available for the workspace, aim for 24 inches minimum width.
- Laboratory safety: A sink containing a plumbed eyewash is needed. This sink should be at counter height and be a size that will minimize splashing and allow proper equipment cleaning, such as a standard kitchen sink. A janitor mop sink or tiny bar sink would not qualify.
- Counter space: A mix of tall (36-37") and standard height (32") counters is desirable. A standard height counter to one side of the cryostat allows the technician to use a microscope ergonomically. Taller counters work well for embedding, staging of cases, and staining setups.
- Incoming cases storage: Maintaining patient identification is crucial during any laboratory procedure. To organize incoming specimens, use a standard letter rack to place the Mohs map and the associated tissue together. (see "Putting a Positive Spin on Inspections" for more on maintaining identification)
- Embedding and cutting tissue: One case is handled at a time, with a unique identifier following each piece throughout the process. There must be enough space to examine the tissue, make any adjustments needed, and embed the tissue. As mentioned prior, use a tall 24-inch-wide counter next to the cryostat where this work can take place effortlessly and a standard height counter on the other side of the cryostat bay for the tech scope.
- Lighting: The workspace around the cryostat must also have ample lighting for examining and embedding specimens. Overhead lighting is not always sufficient, so a small desk lamp functions well as a supplement.
- Staining and coverslipping: There should be space to put the associated Mohs maps in order as the slides are staining. A letter rack or simply open space in front of the stainer works.
- Flammable storage: Placing a 12 gallon 35" tall flammable storage cabinet underneath a 37" counter frees up space in the laboratory while safely keeping volatile reagents. Place the stainer on top.
- Space to accession/ log-in/ file slides/ do Quality Assurance paperwork: The setup is usually opposite the area where the cases enter the laboratory due to the "U"-shaped flow. However, any spot out of the main workflow that allows for space to use logbooks, sort slides, and file ten years of slides can suffice.
Equipment and Space
Cryostat: preferably one designed with Mohs needs in mind. 15+ specimen holders are ideal, and the interior must be well-lit and easy to clean. A Peltier bar is a huge timesaver when embedding.
Manual or Automated Stainer: This author vastly prefers a simple linear stainer, but manual stainers and other autostainers may work for your needs and space.
Microscope for Technician: This is a must for getting complete epidermis and spotting knife lines and other errors before reaching the stainer. The microscope does not have to be top of the line but should easily show epidermis on unstained skin slides. Road test the scope with unstained tissue before buying.
Microscope for the Mohs Surgeon: A two head teaching scope is ideal, as the surgeon and technician can look at slides together, give feedback and troubleshoot if needed. The Mohs surgeon should select what is most comfortable and efficient.
Chemical Storage Cabinet: Enough to hold at least three weeks of reagents. The chemical storage depends on the case volume of the practice. Twelve gallons are appropriate for most labs, although some practices with low case volumes may use a smaller cabinet.
Slide Storage: Per CLIA, slides are retained for ten years. Slide files are modular and additional files can be added over time.
Sink with Eyewash: Local regulations may dictate what eyewash to use in the space. At a minimum, the eyewash should have running water with temperature control.
Fire extinguisher: All fire extinguishers must be certified and placed according to local regulations.
Mohs surgery is an elegant procedure to give optimal outcomes for skin cancer patients. Ensuring the handling of specimens most efficiently and safely will serve patients and the staff well. Set them up for success!

About the presenters
Linda has been with Henry Ford Health System for 22 years, all of which have been in the Mohs Surgery Laboratory, where she is currently a Lead Technologist. She has been active in the Michigan Society of Histotechnology for quite a few years, has been a member of NSH, and now belongs to ASMH.
Jennifer Healy has over 25 years of experience in histology, with a strong focus on Mohs Frozen Sectioning. She earned her degree in Biology and worked with cell cultures and retroviral research before transitioning to histology. She has worked with many Mohs surgeons in various settings from cancer centers and hospitals to private practice. Additionally, Jennifer has designed several Mohs labs for cancer centers and private practice Mohs surgeons.
Related Content


Leica Biosystems Knowledge Pathway content is subject to the Leica Biosystems website terms of use, available at: Legal Notice. The content, including webinars, training presentations and related materials is intended to provide general information regarding particular subjects of interest to health care professionals and is not intended to be, and should not be construed as, medical, regulatory or legal advice. The views and opinions expressed in any third-party content reflect the personal views and opinions of the speaker(s)/author(s) and do not necessarily represent or reflect the views or opinions of Leica Biosystems, its employees or agents. Any links contained in the content which provides access to third party resources or content is provided for convenience only.
For the use of any product, the applicable product documentation, including information guides, inserts and operation manuals should be consulted.
Copyright © 2026 Leica Biosystems division of Leica Microsystems, Inc. and its Leica Biosystems affiliates. All rights reserved. LEICA and the Leica Logo are registered trademarks of Leica Microsystems IR GmbH.