
Vue d’ensemble de la coloration H&E : guide des bonnes pratiques


H&E Staining Overview: A Guide to Best Practices
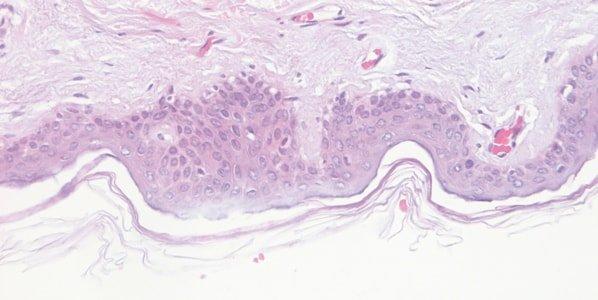
For routine diagnosis, the use of Hematoxylin and Eosin (H&E) is by far preferred for viewing cellular and tissue structure detail by pathologists. The variation of stain intensity is often driven by the pathologist’s learning experience and personal preference. Because this stain demonstrates such a broad range of cytoplasmic, nuclear, and extracellular matrix features, nearly all teaching texts use H&E images. We continue to use this simple and essential stain today, which has remained unchanged for well over a century.
The staining procedure for H&E follows a basic protocol:
- Dewaxing
- Dehydration
- Hematoxylin
- Differentiation
- Bluing
- Eosin
- Dehydration
- Clearing
- Cover-slipping
The format is easily reproduced and the reagents resilient enough to allow for large numbers of slides to be stained consistently before reagents need to be changed.
In the past, stains and their components were routinely made by the laboratory. Commercially available, premade reagents were uncommon and expensive. So, as an economical way to perform H&Es, techs learned to make the dyes as needed. The challenge was to make sure the quality of the stain was consistent. Different techs follow recipes using their own individual approach, so making dyes was typically left to one person. That said, there were also more techs in the laboratory, so the time needed to prepare the reagents did not take away from the overall workload of the team.
Many laboratories find ordering their stains to be the easiest way to ensure consistent and repeatable quality. A large variety of both hematoxylin and eosin stain combinations provide the ability to customize the desired results with very little hassle. As more techs retire and companies become leaner, staffing decreases make the use of commercially available reagents ideal because the techs are better able to focus on embedding and cutting, which are the areas of the laboratory that offer the least amount of automation.
For new professionals entering the field of histology, the days of making reagents are quickly becoming a thing of the past. I find this shift may be problematic, primarily because some of the art that is characteristically histology is lost. One of my personal challenges when working with students is helping them to troubleshoot staining anomalies. When stains are made by the laboratory, the team learns from hands on experience what happens when a component is missing or inappropriately added to the mixture. These changes can make subtle alterations in the stained slides, which the histology team is ultimately expected to fix. Ultimately, newer histology teams can struggle when troubleshooting the subtle changes that can be easily fixed, without having the experience of making reagents and the lessons learned in that process.
What’s in an H&E Stain?
Hematoxylin and Eosin stains are used in many areas of the histology laboratory, including frozen sections, fine needle aspirates, and paraffin fixed embedded tissues. To better understand what makes a well-stained slide, it is important to understand the components of the stain.
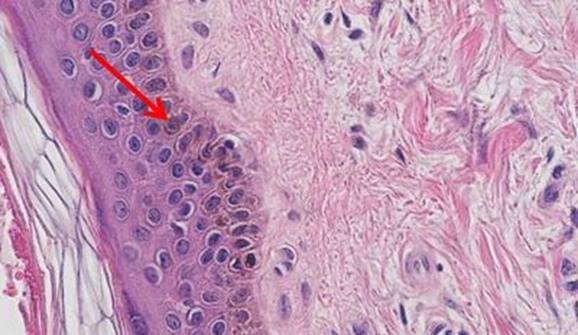
Hematoxylin is used to illustrate nuclear detail in cells. Depth of coloration is not only related to the amount of DNA in the nuclei but also to the length of time the sample spends in hematoxylin.
Hematoxylin is a reasonably simple dye to make. The dye itself is extracted from the tree Haematoxylum campechianum. Oxidation of the hematoxylin produces hematein, which is the actual dye used in an H&E stain. Addition of the mordant improves the ability of the hematein to attach to the anionic (negatively charged) components of the tissues.
Hematoxylins are typically classified by the mordant used before staining. Mordants strengthen the positive ionic charge of the hematin. This aids the bonding of the hematin to the anionic tissue component, which is most commonly chromatin. The type of mordant also influences the final color of the stained components. The most common mordant used in routine histology is aluminum ammonium sulfate (alum). This mordant causes the nuclei to be red in color, which is then changed to the more familiar blue color when the sample is later rinsed with a weakly basic solution.
Mayer's hematoxylin is an alum hematoxylin, a commonly used stain that may be employed for both progressive and regressive stains. It is often used as a nuclear counterstain for special stains and immunohistochemistry. For these applications, Mayer's is used to stain the nuclei and then blued without the use of a differentiator. Mayer's is a water-based stain.
Harris hematoxylin is another commonly used alum hematoxylin that may be used for progressive staining of cytology specimens but can also be used for either progressive or regressive staining in histology. The staining tends to provide clear nuclear detail. One challenge when using Harris is that it is best differentiated with a mild acid, as opposed to the more commonly used hydrochloric acid-based differentiators. Harris is an alcohol-based stain. Gill's hematoxylin is an alum hematoxylin. It may be used as a progressive or regressive stain and is available in different concentrations. Because it is made with water and ethylene glycol, autoxidation of the stain is typically prevented over months, making it more stable than Harris hematoxylin. However, the nature of Gills is such that extra-nuclear staining may occur. Mucin and even adhesives used on the slide may become heavily contaminated with Gills.
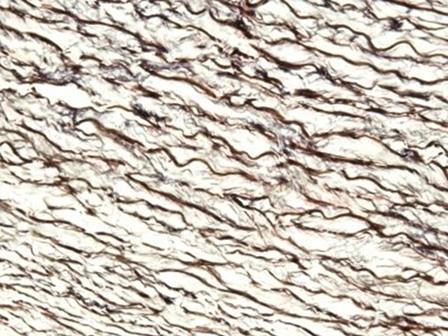
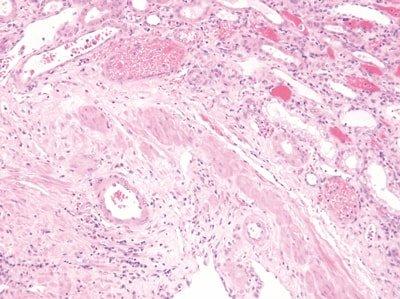
The hematoxylins that use iron salts as a mordant are typically used in special stains. This is because they can demonstrate more tissue structures than alum hematoxylins, such as myelin and elastin fibers. One of the best known is Weigert's, which is used in the Verhoeff-Van Gieson stain, shown in the image.
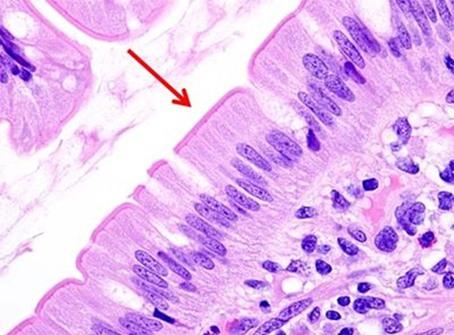
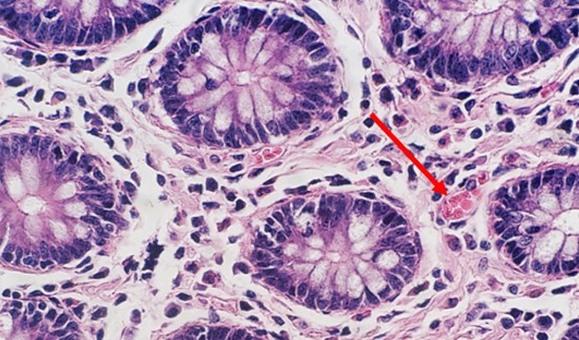
Having reviewed the nuclear stains, let’s talk about the cytoplasmic component dyes. Eosin is the most commonly used counterstain that distinguishes between the cytoplasm and nuclei of cells. It is typically pink, with different shades of pink for different types of connective tissue fibers.
Eosin Y is the most commonly used form of eosin and may be used in both water and alcohol. The addition of a small amount of acetic acid will also sharpen the staining of the eosin. Eosin with phloxine added will enhance the reds seen with H&E staining. So for those who want to see richer looking reds, phloxine may be added.
Many laboratories find ordering their stains to be the easiest way to ensure consistent and repeatable quality. A large variety of both hematoxylin and eosin stain combinations provide the ability to customize the desired results with very little hassle. As more techs retire and companies become leaner, staffing decreases make the use of commercially available reagents ideal because the techs are better able to focus on embedding and cutting, which are the areas of the laboratory that offer the least amount of automation.
Other eosin mixtures are sometimes used, such as EA50 and EA65. These stains are primarily used for cytology, and in addition to eosin Y, include light green, yellowish, and Bismarck brown. The addition of these two dyes provides for the variations in color from pale blue to pink cytoplasm, best noted in the squamous cells of a pap smear. The concentration of the mixture determines the designation of 50 or 65.

The differentiation of stains allows for the ability to selectively remove stain from tissues to the taste of the viewer. In the case of hematoxylin, hydrochloric acid (for rapid differentiation) and acetic acid (for slower, more controlled differentiation) are most commonly used. While hydrochloric acid (HCl) has historically been the standard, milder acids are being used to provide gentler dye removal. Part of this trend is due to the use of automated staining, which must accommodate the movement of the robotic arm in addition to the time spent in the reagent.
Bluing reagents, such as Scott's Tap Water, are used to change the hematoxylin from red to the traditional blue color we expect. These slightly basic solutions chemically alter the dye to produce this color change. In some locations, the tap water contains enough minerals so that the pH causes the water to be basic enough to allow for the bluing of nuclei without the need for a bluing specific reagent. In most cases, though, labs typically add this step to ensure appropriate bluing.
In combination, these components make up the standard stain most used in the histology laboratory.
H&E Stain Protocol Selection
The next step to having a good stain is determining what type of H&E stain is desired. There are typically three types of H&E stains: progressive, modified progressive, and regressive.
Progressive staining occurs when the hematoxylin is added to the tissue without being followed by a differentiator to remove excess dye. Because there is no differentiation step, background staining can occur, especially with charged or treated slides. Pathologists sometimes prefer this type of stain, because the noncellular material, such as mucin, becomes stained with the hematoxylin. This extracellular staining can be an indicator of well differentiated tumors.
The following table contains a protocol with a simple regressive stain that provides a nice balance of nuclear and cytoplasmic stains. This protocol is designed with a mild acid differentiator in mind.
Once the staining components have been selected, it is good to start with the baseline protocol. From there, edit either the hematoxylin in 30 second increments OR the eosin in 15 second increments. Remember, eosin will tend to penetrate much faster. Unless there is the need to significantly lighten or darken the eosin staining intensity, the shorter increments are best. It is also important that only one stain is changed at a time. It may appear that the hematoxylin is overstained, when the eosin just needs to be richer.
As laboratories continue to grow, the need for consistent results and continuous throughput is essential. Reproducibility is an important part of laboratory stain quality. When hand staining, human variables can make each stained slide rack look different from the last. The addition of automation not only removes the potential for inconsistency, but also frees technologists up to perform other tasks in the laboratory.
It is important that the proper balance of the dyes is achieved. Overstaining with hematoxylin can give the illusion of understained eosin, just as overstaining with eosin can cause the hematoxylin to appear lighter than it actually is. So, when optimizing the stain, make sure to only edit the time of one of the components. This technique will help eliminate the need to spend additional time adjusting the stain.
| Xylene | 2 minutes |
| Xylene | 2 minutes |
| 100% ethanol | 2 minutes |
| 100% ethanol | 2 minutes |
| 95% ethanol | 2 minutes |
| Water wash | 2 minutes |
| Hematoxylin | 3 minutes |
| Water wash | 1 minute |
| Differentiator (mild acid) | 1 minute |
| Water wash | 1 minute |
| Bluing | 1 minute |
| Water wash | 1 minute |
| 95% ethanol | 1 minute |
| Eosin | 45 seconds |
| 95% ethanol | 1 minute |
| 100% ethanol | 1 minute |
| 100% ethanol | 1 minute |
| Xylene | 2 minutes |
| Xylene | 2 minutes |
| Coverslip |

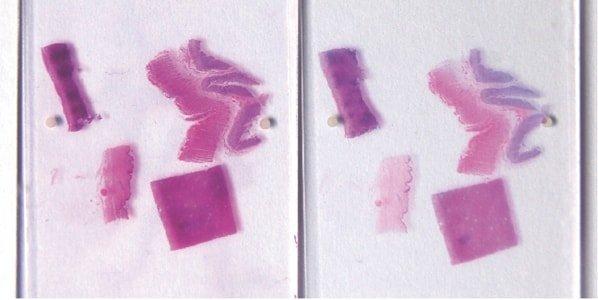
With regressive and modified progressive staining, a differentiator is used. If the differentiator is made in-house, there is the potential for it to be either too weak or too strong. Both scenarios will impact staining. If the differentiator is stronger than intended, it will remove more hematoxylin and will make the nuclei pale. Time is also important. Too much time in a properly prepared differentiator will also remove more hematoxylin and will ultimately understain the nuclei.
Mild acidity is critical to the shelf life of hematoxylin. Without it, the alkalinity of the tap water rinse will raise the pH such that the dye lake can precipitate, and the color will change from cherry red to purple red. Adding small amounts of acetic acid to the hematoxylin periodically will aid in maintaining appropriate pH and can extend the life of the stain.
Water is used as a differentiator for eosin. It is common to follow the eosin step with 95% ethanol. The ethanol aids with rinsing the slide, while water pulls excess eosin from the tissue. This step can help with coloration control but extending the time provides for lighter stains, while shortening the time maintains brighter coloration. However, excess water in xylene can continue the differentiation process and can be seen after coverslipping as a pink haze on the slide.
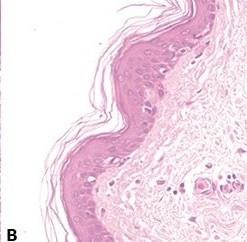
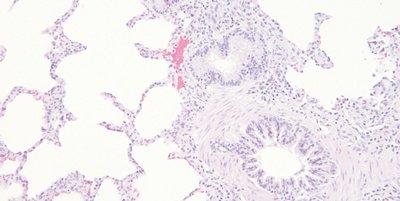
Not all tissues are created equally. Cysts and fatty samples, even when processed correctly, may be very difficult to see grossly once the slide has been stained. These samples often have open spaces where fluids or fat were in the cell, and the thinness of the cell walls may give the appearance of being light when the coloration is simply an artifact of the tissue type.
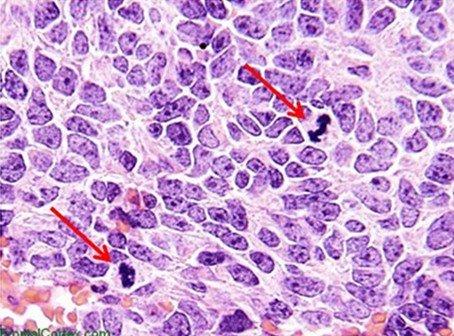
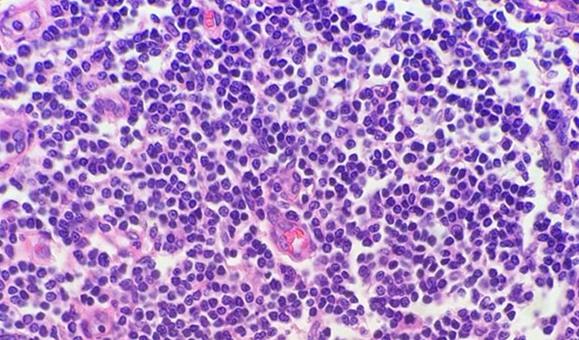
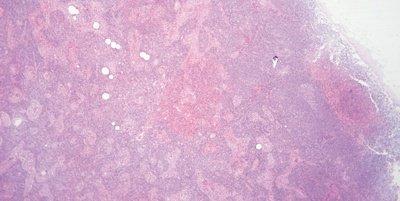
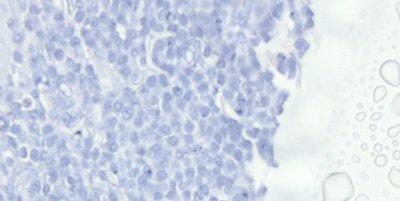
Highly cellular samples (e.g., tonsil, lymph node) can be very concerning. Remember that lymphocytes have little cytoplasm, and there is not nearly the cellular material between cells as with other tissues. For this reason, the hematoxylin does not have to compete with the eosin. The compact nature of the cells also concentrates the DNA, giving these highly cellular tissues the appearance of being overstained, when in reality, they may simply need to be sectioned thinner.
The use of clean and fresh dewaxing reagents is essential for the removal of paraffin from the slide prior to the addition of the dyes. While xylene is the most commonly used solvent, xylene substitutes are gaining in popularity because they are considered less hazardous and more ecofriendly. Water in solvents, whether from reagent contamination or a high humidity environment, reduces the ability of the solvent to remove the paraffin. Remaining paraffin prevents the dyes from penetrating the tissues, thus giving an uneven appearance.
The simplest way to prevent this from occurring is to change reagents more frequently. Adding a small amount of desiccant pellets (about a tablespoon per reagent vessel) will also reduce water contamination within solvents. These measures are especially important when using a xylene substitute, as these reagents tend to be far less tolerant of any water contamination than xylene.
Step by Step Guide to Performing an H&E Stain
The hematoxylin and eosin stain (H&E) is the most widely used stain in histology and histopathology laboratories. When it is properly performed it has the ability to demonstrate a wide range of normal and abnormal cell and tissue components and yet it is a relatively simple stain to carry out on paraffin or frozen sections. In histopathology, a high proportion of cases can be diagnosed by an experienced pathologist using an H&E stain alone.
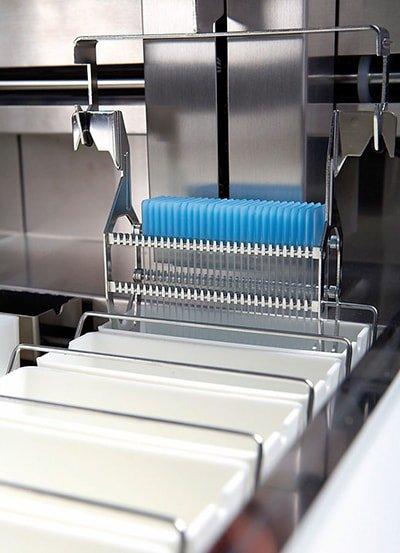
Small numbers of slides can be effectively stained manually, while in laboratories that have a high throughput, staining can be performed successfully and consistently by using automated slide stainers.
There are a number of different hematoxylin and eosin formulations in popular use, each with various advantages and disadvantages. Some laboratories prefer to prepare their own solutions whilst others choose ready-to-use commercial products.
Introduction
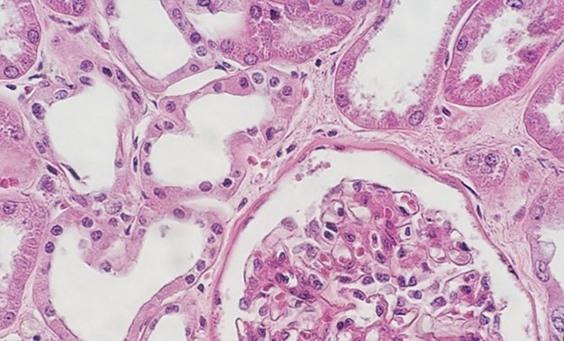
The H&E stain provides a comprehensive picture of the microanatomy of organs and tissues. Hematoxylin precisely stains nuclear components, including heterochromatin and nucleoli, while eosin stains cytoplasmic components including collagen and elastic fibers, muscle fibers and red blood cells. In a high-quality H&E stain, there are subtle differences in the shades of color produced by the stains, particularly eosin, and this aids in the detection and interpretation of morphological changes associated with disease.
It is important that people performing and assessing H&E stains for quality are aware of the subtleties of the stain, know what can be achieved when the stain is properly performed with high-quality reagents, and know what to look for microscopically. The maintenance of consistent, high-quality H&E stains is a fundamental requirement in histopathology laboratories.
In the following sections, the basic steps in performing an H&E stain are outlined.
Remove the Wax
Following the preparation of a paraffin section, all the elements are infiltrated with and surrounded by paraffin wax which is hydrophobic and impervious to aqueous reagents. The majority of cell and tissue components have no natural color and are not visible. The first step in performing an H&E stain is to dissolve all the wax away with xylene (a hydrocarbon solvent).
Hydrate the Section
After thorough de-waxing, the slide is passed through several changes of alcohol to remove the xylene, then thoroughly rinsed in water. The section is now hydrated so that aqueous reagents will readily penetrate the cells and tissue elements.
Apply the Hematoxylin Nuclear Stain
The slide is now stained with a nuclear stain such as Harris hematoxylin, which consists of a dye (oxidized hematoxylin or hematein) and a mordant or binding agent (an aluminum salt) in the solution. Initially this stains the nuclei and some other elements a reddish-purple color.
Complete the Nuclear Stain by “Blueing”
After rinsing in tap water, the section is “blued” by treatment with a weakly alkaline solution. This step converts the hematoxylin to a dark blue color. The section can now be rinsed and checked to see if the nuclei are properly stained, showing adequate contrast and to assess the level of background stain.
Remove Excess Background Stain (Differentiate)
On most occasions when Harris hematoxylin is employed, a differentiation (destaining) step is required to remove non-specific background staining and to improve contrast. A weak acid alcohol is used. After this treatment, blueing and thorough rinsing is again required. Staining methods that include a destaining or differentiation step are referred to as “regressive” stains.
Apply the Eosin Counterstain
The section is now stained with an aqueous or alcoholic solution of eosin (depending on personal preference). This colors many nonnuclear elements in different shades of pink.
Rinse, Dehydrate, Clear and Mount (Apply Cover Glass)
Following the eosin stain, the slide is passed through several changes of alcohol to remove all traces of water, then rinsed in several baths of xylene which “clears” the tissue and renders it completely transparent. A thin layer of polystyrene mountant is applied, followed by a glass coverslip. If the stain and all the subsequent steps have been properly performed, the slide will reveal all the important microscopic components and be stable for many years.
Troubleshooting H&E Stains
Though the H&E stain is a relatively simple stain to perform, there are a variety of artifacts that can interfere with a good stain.
Artifacts can be attributed to a variety of causes.
Steps to Better Routine (H&E) Staining + Coverslipping
From patient to pathologist, preparing tissue specimens for histological examination requires care, skill and sound procedures. This guide provides practical advice on best practice techniques and simple ways to avoid common errors.
Tips for better routine staining and coverslipping are highlighted in this section. We hope each step provides a valuable reminder of good histology practice and helps with troubleshooting when unacceptable results do occur.
Want to see all 101 Steps to Better Histology?
Download 101 Steps to Better Histology now!
Use Accurate Timing
Each step in the staining protocol is accurately timed.
Step times in staining are approximate and “if we are in a hurry” some steps are skipped. This can produce inconsistent results.
Regularly Monitor Quality
Control slides are regularly stained to monitor stain quality.
Control slides are never used for H&E stains. This can make it very difficult to determine whether a staining problem is due to poor reagents, an inappropriate protocol or poor fixation.
Standardize Staining Conditions
Agitation, wash and drain times are optimized for all steps during staining.
Agitation, wash and drain times are inconsistent. Solvents and reagents rapidly become contaminated. Staining becomes inconsistent.
Ensure Complete Dewaxing
Slide dewaxing is optimized.
Slide dewaxing is sometimes incomplete, and slides contain patches of residual wax. This produces unstained, or unevenly stained areas in sections.
Renew Reagents Regularly
Solvents and staining reagents are regularly replaced based on the number of slides stained or racks processed.
Replacement of solvents and staining reagents is haphazard. They are not replaced until stain quality declines.
Hydrate Sections Thoroughly
Slides are thoroughly hydrated prior to hematoxylin staining.
Hematoxylin solution rapidly becomes contaminated with alcohol and sometimes xylene. This causes uneven staining.
Monitor Hematoxylin Quality
class="fa fa-check-circle">The performance of hematoxylin solutions is carefully monitored. During their working life, hematoxylin solutions are progressively diluted by carry over from slides and racks and are also affected by continuing oxidation.
Hematoxylin staining is variable from day-to-day, and no attempt is made to understand why. For example, the staining bath surface area, the extent of aeration during staining, and the ambient temperature can all affect the oxidation rate.
Ensure Complete Nuclear “Blueing”
Thorough “blueing” of nuclei with Scott’s alkaline tap water substitute or ammonia water is always performed after hematoxylin staining. This requirement is influenced by the natural pH of the local tap water.
Sometimes nuclei appear pinkish in completed sections due to incomplete “blueing” in alkaline tap water after hematoxylin staining. Nuclei that are understained with hematoxylin (or over-differentiated) and overstained with eosin also appear pink.

Avoid Uneven Eosin Staining
“Blueing” is followed by a very thorough wash in tap water to remove residual alkali that can impede eosin staining and cause weak and uneven staining.
Inefficient washing after “blueing” (leaving residual alkali) causes eosin staining to be weak and uneven.
Monitor Eosin pH
The pH of the eosin solution is monitored. It is kept close to pH 5.0 to maintain optimal staining. The addition of a couple of drops of acetic acid can be used as a convenient means of lowering pH.
No attempt is made to monitor the pH of eosin. When staining intensity falls away the solution is replaced (carry over of alkaline tap water can cause the pH of eosin solutions to rise).
Thoroughly Dehydrate Before Clearing and Coverslipping
Sections are thoroughly dehydrated before being placed in xylene for clearing.
Sections are sometimes rushed through alcohol to xylene. Clearing in xylene contaminated with water can result in the presence of tiny water droplets in the tissue that are seen microscopically as opaque areas lacking detail.
Avoid Drying and Crystal Formation
The coverslip is always applied before the section has a chance to dry and a high-quality mountant is used. The long-term storage qualities of the mountant must be known because crystals can appear in poor quality mountant,sometimes after a long period (months or years).
Sections are allowed to partially dry before the coverslip is applied causing some nuclei to appear black. Mountant chosen based on price alone may develop crystals during long-term storage and coverslips may lift.
About the presenters
Cindy Sampias is a board certified Cyto- and Histo-technologist. With more than 25 years of experience, she is a guest speaker at histology and cytology meetings around the country. She is a technical author for Media Lab, publishing a variety of technical courses and sharing best practices in histology.
Geoffrey Rolls is a Histology Consultant with decades of experience in the field. He is a former Senior Lecturer in histopathology in the Department of Laboratory Medicine, RMIT University in Melbourne, Australia.
References
This reference document is presented as a service to health care professionals by Leica Biosystems and has been compiled from available literature. Although every effort has been made to report faithfully the information, Leia Biosystems cannot be held responsible for the correctness. This document is not intended to be, and should not be construed as medical advice. For any use, the product information guides, inserts and operation manuals of the various drugs and devices should be consulted. Leica Biosystems and the editors disclaim any liability arising directly or indirectly from the use of drugs, devices, techniques or procedures described in this reference document.
Related Content


Leica Biosystems Knowledge Pathway content is subject to the Leica Biosystems website terms of use, available at: Legal Notice. The content, including webinars, training presentations and related materials is intended to provide general information regarding particular subjects of interest to health care professionals and is not intended to be, and should not be construed as, medical, regulatory or legal advice. The views and opinions expressed in any third-party content reflect the personal views and opinions of the speaker(s)/author(s) and do not necessarily represent or reflect the views or opinions of Leica Biosystems, its employees or agents. Any links contained in the content which provides access to third party resources or content is provided for convenience only.
For the use of any product, the applicable product documentation, including information guides, inserts and operation manuals should be consulted.
Copyright © 2026 Leica Biosystems division of Leica Microsystems, Inc. and its Leica Biosystems affiliates. All rights reserved. LEICA and the Leica Logo are registered trademarks of Leica Microsystems IR GmbH.