
The Art of Frozen Tissue Sectioning
This article describes a system used for embedding of tissues for the preparation of frozen sections. This novel system uses simple techniques and apparatus to accomplish face down embedding in freezing temperature steel wells. The system is easy to learn and offers many advantages over conventional methods, including speed, high precision and predictability, and reduced tissue wastage. The system is easily adapted in most existing cryostats, uses no additional consumables, and requires minimal maintenance.
Introduction
As a practicing pathologist, I can think of no more intimidating task than preparing and interpreting the frozen section. The pathologist, armed only with a few jars of stain and a cryostat, is asked to steer the course of a patient's surgery based on a small sample of tissue. This formidable task is a sharp taste of reality. This sense of wariness remains with a pathologist throughout his or her career. To provide the necessary answers to the questions put before us in the frozen section room, there are a number of steps that must be performed without flaw. These include gross examination and sampling of the tissue, accurate embedding of the tissue, cutting and staining high-quality slides, and finally interpreting the slide(s). At each of these steps, a poor preparation can yield disastrous results.
This article will concern itself with the process of embedding tissue for frozen section. Although embedding some cases is a simple process where orientation is not critical, there are many specimens where our ability to provide an answer relies on perfect orientation of the specimen within the block.
In conventional cryostats, tissue is embedded for frozen section by placing it face up on a tissue holder and covered with an embedding medium. The tissue holder or "chuck" is then set upon a freezing temperature bar. A heat sink is applied to the top of the tissue at the proper moment to speed the freezing process and flatten the surface of the tissue to create a flat plane. There are many shortcomings to this system, which can lead to considerable frustration. The system works adequately in situations where a large volume of tissue is available and precise orientation is not an issue. A sizable sample can be embedded and simply trimmed to a level where the operator is satisfied with the tissue face. Unfortunately, current methods are inadequate in a significant percentage of cases where high precision and predictability of the prepared tissue face is essential. The result can be substandard preparations requiring significant trimming and attrition of tissue sample. Additional distortion can result from crushing of the tissue by the weighted heat extractor. This method of tissue embedding, at best, prepares rough approximation of what is possible with paraffin embedding.
The problem is magnified when confronted with minute samples and thin cores. It can be difficult to get all the desired tissue in a section without trimming away significant portions of the sample. Further difficulties arise in situations where flimsy thin and difficult to handle samples need to be embedded in precise orientation. Standing these samples in a puddle of freezing embedding medium and teasing each into place while bent over the cryostat is an uncomfortable situation on many levels.
Seasoned histotechnologists have devised a variety of techniques and makeshift apparatus in attempts to achieve optimum results. One such technique is to use pre-frozen chucks coated with a flattened layer of embedding medium. This affords the tissue a flat surface on which to stand rather than the irregular grids and furrows designed to grip the frozen tissue and medium that form the face of chucks. Others will flatten tissues against a frozen surface before embedding it face up on a chuck. Histotechnologists in the area of Mohs surgery will use a technique of incising the specimen in such a way as to relax the skin so that it can be more easily flattened.
The frozen section process is very demanding by virtue of the ever-present pressure to provide a fast result. The stress is increased when multiple specimens are delivered by a number of surgeons simultaneously. Using the conventional system in modern cryostats it can take 90 seconds or more to freeze a block, during which we must monitor the freezing for the proper time to place the sole heat extractor over the freezing block. To speed the process some institutions have turned to alternate means of rapidly freezing tissues, such as immersing the tissue into liquid nitrogen or other super-cooled liquids. This rapid process affords less freezing artifact but is limited in precision.
A handful of innovative minds have recognized the limitations and frustration with conventional methods and have marketed alternative means of embedding tissue for frozen section. These have included devices ranging from simple flattening devices to complex and elaborate instruments with the hope of providing the user with a more articulate means of achieving the proper orientation of tissues. So far, these products have not made their way into the hearts of the major cryostat manufacturers.
This article describes a system consisting of a simple apparatus and techniques used to embed tissue for frozen section. The system embeds tissue face down using freezing temperature wells machined into the surface of steel bars. Although similar to paraffin embedding, the system has a distinct advantage. This advantage is the physical property that causes tissue to stick to freezing steel. This property facilitates the setting of tissue into wells and is easier than standing tissue in solidifying paraffin. The advantages that will be outlined in this article include precision, predictability, speed, and reduced tissue wastage, ease of training, comfort, and convenience.
Materials and Methods
The apparatus described in this article was created by the author who is President of Pathology Innovations, LLC, of Wyckoff, NJ. The apparatus consists of a number of component parts described below.
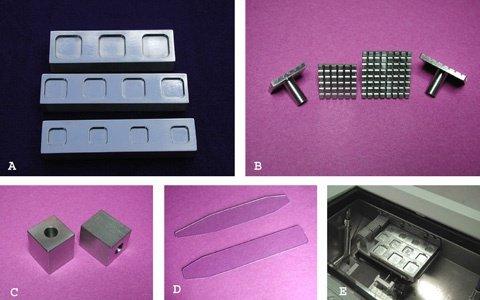
Embedding Well Bars
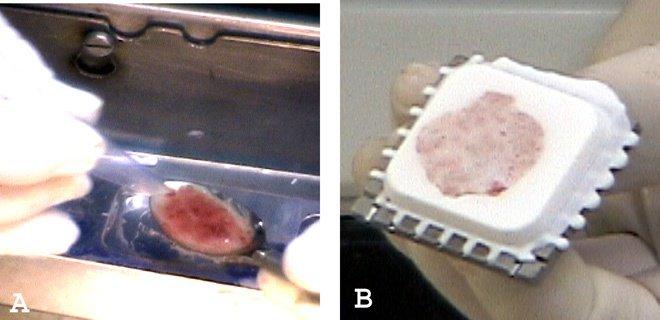
Embedding is performed in wells machined into the face of one-inch thick stainless steel bars (Figure 1A). When cooled to cryostat temperature, these rather substantial bars provide a powerful heat sink for rapid freezing. Wells are machined with beveled walls, rounded edges, and polished surfaces for ease of release. In its current form, the author uses square wells with rounded corners of diameters 18, 24, and 30 mm across the base. Wells of varying sizes and depths can be made to fit different situations. Well bars are stored at the deepest convenient point in the cryostat where temperatures are lowest and brought to higher or more accessible location during the embedding process. In many cryostats a small shelf can be installed for this purpose. An ambient cryostat temperature of -23 to -27 °C functions ideally for rapid freezing.
Chucks
Chucks are designed with a crossing grid pattern of sharply cut channels to maximize the gripping power required to hold the embedded tissue block (Figure 1B). The width and depth of the channels allow for complete penetration of embedding medium when used cold and can therefore be stored at freezing temperatures to facilitate rapid freezing. The crossing grid pattern allows for extrusion of excess embedding medium so that chucks can be pressed flat to the well bar face. The chucks are made of stainless steel, maximizing their freezing power and durability and are stored in a bin at a convenient location low in the cryostat. Chucks freeze optimally when used cold but can also be used warm with use of the over-chuck freezing block described below. Stemmed chucks are most suitable for this process. The stem is the focal point to apply the necessary sharp tap resulting in an easy release of the block from the well. These chucks fit many of the major brand cryostats and can be used in most cryostats with use of an adaptor.
Over-Chuck Freezing Blocks
The over-chuck freezing blocks constructed of rectangular steel function as a heat extractor (Figure 1C). They are designed to fit over the stem of the chuck. The freezing block also serves as a dislodging tool. A light tap of the chuck stem cleaves the plane of adhesion, holding the formed block to the well. These blocks also serve as a convenient flat freezing surface useful in the plastering technique discussed below.
Dispensing Slides
The thin transparent dispensing slide is made of vinyl and serves to precisely orient the tissue into the desired position, and as a means to accurately transfer tissue to the embedding well floor (Figure 1D). The tissue is applied to the end of the transparent slide face down where it can be visualized from below and manipulated into position. The face that is visible will be laid onto the well floor and will ultimately be the embedded surface to be sectioned.
Embedding Shelf
This removable embedding shelf is designed to be installed on the front wall below the opening of the cryostat in the most convenient and ergonomically comfortable location available (Figure 1E). The shelves are made in various sizes to accommodate most instruments. The shelf pictured accommodates three well bars capable of embedding 12 blocks. Well bars can be used on a convenient flat surface such as a brush holder, in cryostats that are not compatible with an embedding shelf.
The Technique
Orient the Tissue on the Dispensing Slide
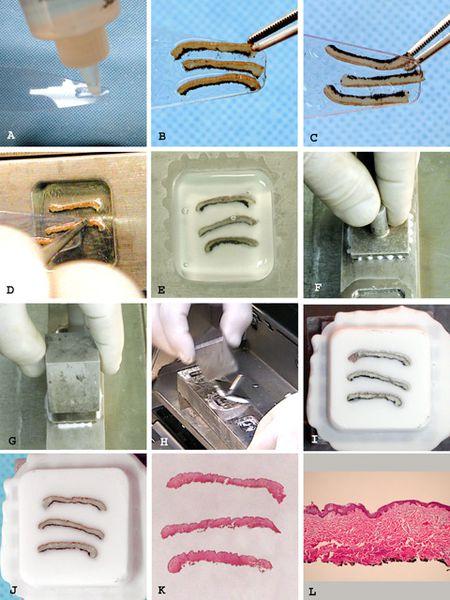
- Wet the dispensing slide with a thin coating of embedding medium (Figure 2A).
- Place the tissue to be embedded face down at the end of the slide (Figure 2B).
- View the tissue through the transparent slide. Make any adjustments to the tissue to assure exact positioning of desired tissue face (Figure 2C).
Placing Tissue in the Embedding Well
- Tissue is pulled to slightly overlap the dispensing slide by about 1 mm.
- The overhanging edge of tissue is touched to the desired location in the well floor where it adheres to cold steel (Figure 2D).
- The dispensing slide is pulled out from under the tissue, which falls and adheres to the well floor. Tissues requiring precise orientation can be manipulated into exact position as the dispensing slide is slowly pulled away.
Filling the Well with Embedding Medium
Fill the well with embedding medium to its maximum capacity so that a meniscus bulges above the level of the well bar surface (Figure 2E).
Placing the Chuck Over the Well
Immediately press the chuck over the well flat to the well bar surface (Figure 2F). Any excess medium will be extruded through the channels in the chuck.
Placing the Over-Chuck Freezing Block
The over-chuck freezing block is placed over the chuck stem (Figure 2G).
This is a mandatory step when using a warm chuck or using the large 30 mm well.
Freezing Period
Optimal freezing conditions refer to completely cooled well bars and chucks stored in a cryostat at -24 °C.
Optimal freezing conditions are as follows: 18 mm well, 20 sec; 24 mm well, 35 sec; 30 mm well, 60 sec.
Removal of the Block
A sharp tap of the chuck stem with the over-chuck freezing block easily frees the prepared block (Figure 2H and 2I).
Further Details on the Technique
Dispensing Slides
Slides narrow to various tip widths. The width of the tip is chosen based on the tissue size and the well size in which the tissue is being placed. Looking through the slide offers a view of the tissue face that will be placed down on the well floor. While looking through the back of the slide, tissue can be adjusted into the precise orientation desired.
This may be such that the epidermis or margin is visible, or to place a tissue on edge. Then as the tissue leaves the slide, it is guided to adhere in the desired position.
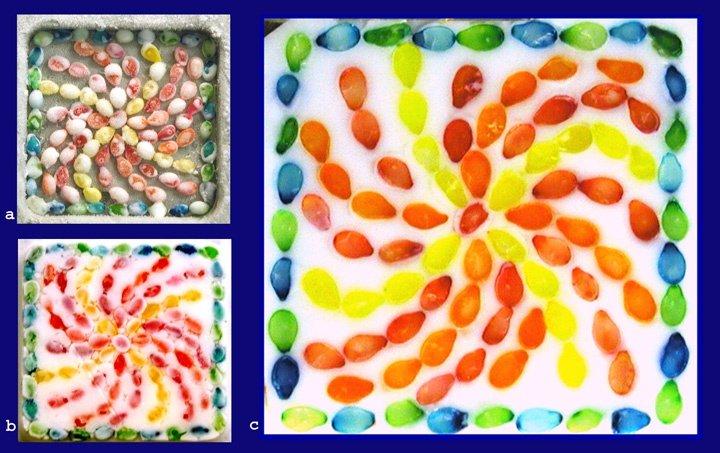
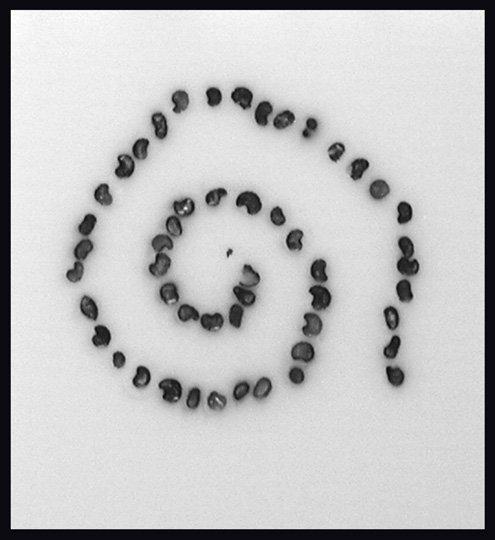
A thin coat of embedding medium assures a clean easy release of the block and assures adhesion of tissue to the well floor. This layer of medium also provides a support for the tissue, aiding in manipulation on the dispensing slide and providing adhesion to the slide during transport. If excess embedding medium is used there will be a thicker layer of frozen medium than desired over the embedded tissue. This is an issue when extreme flatness is required such as when embedding multiple minute samples or needle biopsies flat. Figure 3 demonstrates an artistic example requiring extremely flat embedding. The samples in this case are colored sesame seeds. This could not have been accomplished without use of a very thin layer of embedding medium to adhere the sesame seeds to the well floor.
If there is no risk of cross contamination, several samples of tissue can be placed on a single slide and pulled to the end for placement in one or more wells. For example in sampling a large tumor, four 1 cm squares can be placed in a 30 mm well. This allows a rather large amount of tissue to be sampled from a single sectioned block. If one were looking at separate specimens such as lymph nodes from four different sites however, separate dispensing slides must be used to avoid cross contamination.
Placing Tissue in the Well
Orientation and location of the tissue in the well should be considered before placing the tissue. If a large portion of tissue is being placed on the floor of the well, “touch-down" must take place at a point in the well that will allow room for the whole piece. For example, if a 2 cm length of tissue is placed in a 30 mm well, it should be touched down beginning near the edge rather than in the middle. If four 1 cm squares were placed in the 30 mm well, they should be placed squarely near the walls in the comers allowing for room (Figure 4). As in all frozen section preparation, the orientation of the tissue to the blade should be considered. For example, many practitioners agree that the epidermis should be oriented perpendicular to the blade when cutting skin.
The process of pulling the slide out from under the tissue can require a great deal of precision toward achieving the final result. In samples requiring no orientation, the slide can be removed in a swift motion. In samples requiring precise orientation this process can be carried out more slowly and meticulously. If the shape of the sample allows, the most critical edge of the sample should be first to touch down. The slide can then be slowly pulled out from under the sample with care being taken using forceps to guide the critical area to adhere to the steel in the desired orientation. If an inked margin is being examined, extra care can be taken to assure that the margin is first adhered, after which the remaining portion can be dealt with. In a thin strip of skin from a Mohs surgery case, great care can be taken to assure the epidermis is completely visualized and that the specimen is embedded flat. Specimens requiring extreme flattening can be pressed flat with the bottom of an angled forceps. Tubules, such as ureter margins, can be easily touched to adhere to the well floor in vertical orientation. Thin strips can be guided, so the edge adheres down for on edge orientation. Membranous fragments can be rolled or folded to stand on edge on the dispensing slide and pulled off and embedded in the same orientation. With a little foresight and imagination there are endless opportunities to achieve the desired embedding goals.
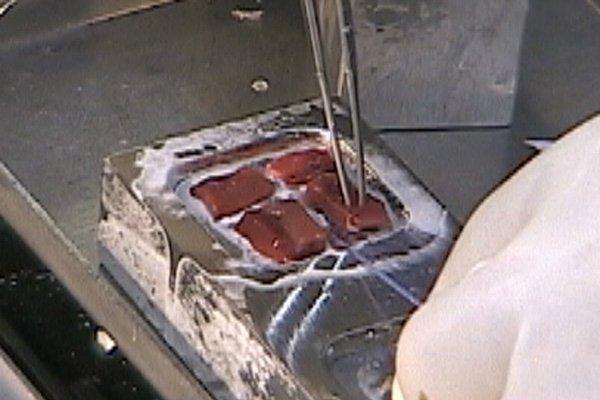
Handling Liquids
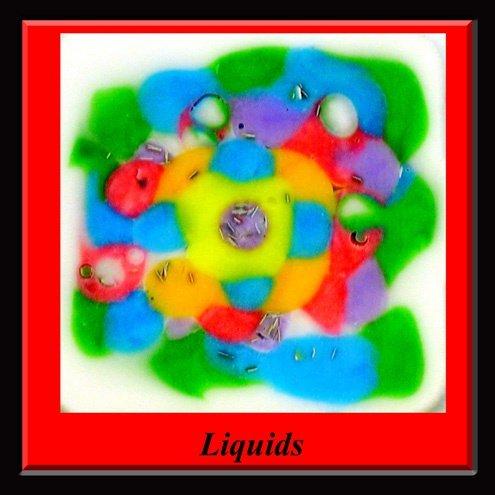
Liquids and very soft specimens, such as endometrial curettings and products of conception, can be scraped up with a plastic spoon or spatula and placed neatly in wells without crush artifact (Figures 5A and 5B). In very bloody liquid specimens, stirring in a few drops of embedding medium will allow the bloody portion to cut with less shattering. Figure 6 shows an example of the precision possible handling liquids using this system.
Filling the Well with Embedding Medium and Placing the Chuck
There must be a bulging meniscus of embedding medium to penetrate the channels in the chuck face for firm bonding to the formed block. The chuck should be placed over the well as quickly as possible after filling. The chuck is placed by firmly pressing the chuck face to the well bar surface. The excess medium is extruded through the grooves in the chucks.
Freezing Times
The recommended freezing times are approximate times experienced by the author when well bars and chucks are fully cooled. Freezing time will increase if well bars are allowed to warm, if chucks are used warm or if samples are very thick. The user quickly develops a sense for when the block is ready. Well bars should be returned to the lower level of the cryostat as soon as chucks are removed to maintain optimal temperature. Chucks should be cleaned, dried, and replaced in the cryostat as soon as possible for maximum performance. There is considerable variation of temperature at different levels of the cryostat. The embedding shelf is installed at a high level to optimize the operator’s ability to perform these critical fine manual tasks. Well bars, chucks or blocks will warm above optimum working temperatures if left on the shelf for prolonged periods.
Handling Numerous Specimens
When confronted with numerous specimens, this system lends itself to processing multiple blocks very quickly. Dispensing slides should be prepared in advance in an effort to keep the slides and specimens in order prior to filling the wells. Chucks are easily labeled after they are placed over the well. If the chucks are fully cooled, the blocks can be removed from the well in around 15 seconds before freezing is complete. The freezing process is completed on any freezing surface while additional blocks are prepared. In the time it takes to fill the four wells, the first ones filled can be removed, and additional specimens placed in the empty wells. By the time the practitioner is ready to cut the blocks, they will be fully frozen. Eight blocks can be frozen in under two minutes.
Removing the Block
A sharp tap to the stem of the chuck using the over-chuck freezing block easily frees the blocks. The sharp tap causes a cleavage in the plane of cohesion that forms between the cold steel and the frozen medium. If one tries to pull the block out by the stem, they will find it firmly attached in the larger wells, yet a sharp tap will release the block with ease.
Blocks will free intact even if incompletely frozen, provided the surface beneath the chuck has had time to freeze to the chuck.
If a chuck pulls off, it is either the result of underfilling of the well with medium or using a warm chuck without the over-chuck freezing block. An easy quick repair is possible by adding an additional layer of embedding medium and a new chuck.
Plastering
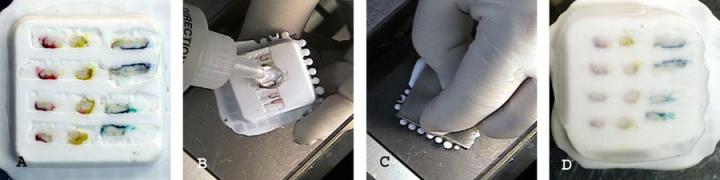
The plastering technique is used to repair any holes, defects, or crevices encountered in the face of a block prepared using this system or conventional methods (Figure 7). At times a small contraction space may form at the surface of the block between the medium that coated the tissue and medium that filled the well. This space is very superficial and will be quickly trimmed away in the early surfacing of the block. In minute samples where there is only minimal allowable trimming, the plastering process will fill any defect in a few seconds. Filling holes arising from bubbles in embedding medium or the defect left behind after removing an uninvited staple from the block will improve ability to get a complete section. Figure 7A shows an example of surface irregularities which can be seen in frozen block cryoembedding quickly filled by plastering. The plastering technique is performed as follows:
- Apply a drop of embedding medium to any significant defects on the block face (Figure 7B).
- Press the block face to a freezing surface (Figure 7C)
- Release with a tap or pull (Figure 7D).
Medium can be applied as a drop from the bottle, a thin smear with the finger, a straight edge of cardboard, or any device which acts as a putty knife. If trimming has begun, this process can be performed while the block is in the holder by applying medium to the block face and then pressing the over-chuck freezing block to the face of the tissue block. This technique can be used to apply a "handle of embedding medium" to the edge of the block if a critical portion of the tissue is too close to the edge to get a quality section.
Orienting the Tissue to the Knife
This is an extremely important aspect of frozen section preparation. Using the embedding system described in this article, it is quite easy to prepare and orient tissues in the wells so that the knife meets the tissue in a specific orientation. Based on extensive experience, the following rules of thumb apply:
- Fat should be the last thing to hit the blade, or should hit the blade by itself when possible (Figure 8A and B). Fat does not get hard enough to cut well at temperatures that are best for cutting most other tissues. When fat hits the blade before the more manageable tissues, it may smear and ruin the rest of the section. I find by arranging for the fat to meet the knife last or by itself, there is minimal interference with other tissues. If I find myself having difficulty getting a good section because fat appears in the plane, I rotate the chuck to avoid the fat.
- The most critical edge of the tissue should be perpendicular or diagonal to the blade and not the first or last aspect of the tissue to meet the blade. Consider a section as having a beginning, middle, and an end. At the beginning there is a risk of curling, or brush damage, possibly thickness issues because of hesitation engaging the tissue. These are opportunities for artifacts. Similarly, at the end, curling may become an issue and possibly stretching in picking up the tissue. The middle is the zone where the tissue passes most smoothly across the blade. We are less likely to see artifacts and have the cleanest histology. This is where I want to see that critical portion of the slide such as an inked margin.
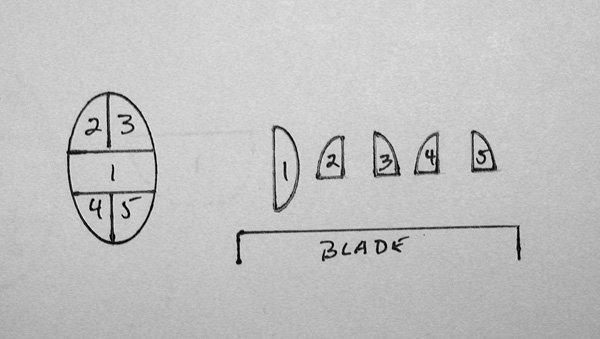
- Epithelial and mucosa lined tissues such as skin and gastrointestinal, bladder, uterus and cervix should be oriented with the plane of the epithelium perpendicular to the blade. When embedding a skin ellipse, the end which meets the blade first has a tendency to curl. The diagram in Figure 9 shows an approach to embedding a small skin ellipse, so that the longitudinal margins (2-5) will hit the blade last.
I am sure there are many other ideas and suggestions on this subject. We all learn so much of this in our own experience. The point is to consider the outcome as a result of how the tissue meets the blade. This system offers the ability to arrange the tissue however you would like to.
Discussion
This system of face down embedding of tissues reproduces all of the advantages of face down embedding, as in paraffin embedding used in routine histology. The property of the tissue to immediately stick to the cold steel makes this process even easier than paraffin embedding in many ways. The system provides distinct advantages over available methods for embedding tissue for frozen section, including speed, precision, reduced tissue wastage, ease of learning, and convenience.
The speed in which the frozen sectioning is accomplished is improved on several levels. The preparation of individual blocks is considerably faster than using the typical freezing bar heat extractor arrangement offered in today's cryostats. Using this apparatus, blocks are frozen in as quickly as 20 seconds for small wells and I minute in the largest wells. This system improves speed of preparation by lending itself to rapid preparation of multiple blocks. Once wells are filled, there is no need for monitoring the freezing process for the moment when the heat extractor should be placed. When confronted with multiple samples at a time from different operating rooms the ability to leave the cryostat to perform other tasks while the blocks are freezing saves valuable time. Speed is also enhanced by the need for fewer blocks. The large 30 mm well allows panoramic tissue sections to be viewed or multiple samples to be placed in a single well. Another advantage is that the blocks are all prepared to be flat, of similar thickness, with chuck faces approximately parallel to the tissue face. This leads to less trimming of blocks and less need to adjust the angle of the chuck holder in order to get the desired section without wasting tissue in trimming.
The ability of this system to provide a flat highly predictable embedded tissue face is the feature of this system which improves the ability to deliver accurate diagnosis. As has been discussed earlier, this system allows the operator to orient the specimen precisely with the desired tissue surface in a flat plane. Face down embedding has been used in the past in the form of plastic molds. There is a distinct advantage to this system over plastic molds that capitalizes on the physical property of tissue to stick to freezing temperature metal. The tissue is easily placed into any position by adhering to the well floor. The flower petals in Figure 10 are simply placed in a drop of embedding medium and stood on edge. This can be just as easily accomplished using a membranous portion of tissue, or to stand a hair upright for that matter. Multiple pieces can be oriented precisely in any direction so the tissue can hit the knife at the desired angle, allowing the best quality section.
This system also avoids the crushing artifact results from the heat extractor weights flattening the tissue surface as offered in conventional cryostats.
The amount of trimming needed to get a complete section is greatly reduced as a result of the flat tissue face. The ability of the system to place the desired tissue surface in a flat plane alleviates the need to cut deeper and deeper to get a specific area, a complete epidermis, or a complete margin. Figure 11 shows a block with 51 poppy seeds trimmed in a single plane. If one considers an analogy of being given 51 tiny brain biopsies the size of a poppy seed, what is the chance that all 51 could be visualized on a frozen section using conventional methods? And, how many would be left for permanent sections? The result of this precise and flat embedding is the ability to preserve a sample for permanent sections, also referred to as the frozen section control.
This system can be easily taught and learned. With minimal experience, residents and technologists can prepare samples that cannot be achieved using conventional methods. Many attending pathologists who know a less experienced resident is preparing their slides can be comforted with the quality of the preparation this system can yield. It is also a very convenient system for either the attending pathologist to quickly and reliably embed the sample for the resident or technologist to cut. Knowing that the surface which is placed down is the surface the technologist will see when the block emerges.
The placement of an embedding shelf beneath the front opening of the cryostat maximizes the comfort and dexterity available in the embedding process.
The system uses apparatus that function simply by being kept cold in the cryostat. The apparatus is constructed of stainless steel that will ensure a lifetime of service under any conditions. The only potentially expendable parts are the vinyl dispensing slides which are very inexpensive. Other than embedding medium, there is no need for expensive consumables such as liquid nitrogen. If an embedding shelf is to be installed, it simply requires placement of two screws in the front wall of the cryostat, a task that is easily within the reach of hospital maintenance personnel or cryostat servicemen.
The only maintenance required is occasionally wiping the well with alcohol dampened gauze. It is rare to see anything other than frost left behind in the wells. On occasion, in instances where crumbling necrotic tissue or bloody liquids are placed in the well, a small residue may be seen. In general, the layer of embedding medium placed on the dispensing slide creates a clean plane of cleavage. Any microscopic residue that might go unnoticed and could adhere to the next new block would be trimmed off in the initial surface trimming of that block.
Conclusion
This system for embedding tissue samples for frozen section uses face down embedding in freezing temperature wells and offers dramatic advantages in precision, speed, decreased tissue wastage, ease and comfort. The system can be easily adapted to existing cryostats of all varieties. The system requires a simple apparatus and once installed requires only simple cleaning as maintenance.
Figures


Acknowledgments
The author would like to thank the following educators for their time and expertise in helping to prepare this article: Zoe Ann Durkin. Med. HT. Hartford Hospital: Sandra King. BS, HT. Darton College University System of Georgia: Pamela Colony. PhD. HT, SUNY College of Agriculture & Technology; Hazel Dalton, BA, HT. U of Texas. MD Anderson Cancer Ctr.: Paula Bober. HT DMC. University Labs-Harper University Hospital. I would also like to thank Barbara Stripoli for educating me in the art of frozen section in Mohs Surgery and Michael Mac Dougall of the Belair Instrument Company for his support and technical advice.
About the presenter
Dr. Peters received his BA and MD from Boston University. He is currently the Director of Surgical Pathology and Associate Professor of Pathology at the New Jersey Medical School, Rutgers University. He is also the President of Pathology Innovations, LLC.
Related Content


Leica Biosystems Knowledge Pathway content is subject to the Leica Biosystems website terms of use, available at: Legal Notice. The content, including webinars, training presentations and related materials is intended to provide general information regarding particular subjects of interest to health care professionals and is not intended to be, and should not be construed as, medical, regulatory or legal advice. The views and opinions expressed in any third-party content reflect the personal views and opinions of the speaker(s)/author(s) and do not necessarily represent or reflect the views or opinions of Leica Biosystems, its employees or agents. Any links contained in the content which provides access to third party resources or content is provided for convenience only.
For the use of any product, the applicable product documentation, including information guides, inserts and operation manuals should be consulted.
Copyright © 2026 Leica Biosystems division of Leica Microsystems, Inc. and its Leica Biosystems affiliates. All rights reserved. LEICA and the Leica Logo are registered trademarks of Leica Microsystems IR GmbH.